


Tamiya 1:35 Sturmgeschütz III Ausf G, reference 35197
Background:
The Sturmgeschütz III assault gun was Germany's most manufactured AFV during WWII, with over 10,000 units being produced. If you think it looks similar to another German WWII tank, then you’d be correct as it was built on the Panzerkampfwagen III chassis. The most common variant of the StuG III was the Ausf G, the same variant that this model examples; over 7,000 of the Ausf G were produced, which saw many changes during its production run from late 1942 until the end of the war in 1945, but the original features are easy to see:
• 75mm StuK 40 L/48 barrel
• Three return rollers
• Six paired road wheels per side
• Turret roof flap-style hatches for the loader
• An especially made cupola for the commander; the Sturmgeschütz-Kommandantenkuppel had seven vision block periscopes, in addition it enabled the deployment of a SF14Z scissor periscope through a flap at the front of the cupola lid.
The StuG became particularly useful towards the latter part of the war, when Axis forces’ tactics had changed from their lightning-offensive of the Blitzkreig to the long, drawn out attrition of successive defensive withdrawals facing the onslaught of Bagration and the like. The features of the StuG that gave it the edge were its low silhouette and relatively powerful 75mm canon in a lighter and more easily manufactured chassis with less complicated and numerous parts. In a defensive role this particular ‘tank hunter’ was an excellent weapon of concealment when deployed against oncoming foes, where the classical idea of mobile tank warfare was less important than actually hitting the oncoming foe in a more subtle defensive operation.
The Kit:
For this model I used the 1/35 Tamiya base kit (35197) and the following aftermarket items:
• ATAK Zimmerit For StuG III Ausf G (Model 2) (35022)
• Eduard Sturmgeschütz III Ausf G grills (EDTP010)
• Eduard Schürzen ‘A-type’ Russia 1944 StuH 42/ Sturmgeschütz III (ED35721)
If you have not used ATAK Zimmerit sets, you are in for a pleasant surprise. I find this sheeted Zimmerit works especially well when bonded directly to the styrene with Tamiya Extra Thin Cement. You could use a form of cyanoacrylate, but doing this you have less opportunity for ‘playing’ the fit, furthermore, you could also use Pritt Stick if you wish, but I have found this to be a little more messy than other the other adhesives mentioned. One rather splendid thing about ATAK Zimmerit sets is that not only can you damage it but the sets usually leave a little bit over. In this instance all of the kit Schürzen covers were left unused, which allowed me to add coverage to the gun mantlet, reference for which I obtained from the recently released Panzerwrecks 7, ‘Ostfront’. With a little bit of imagination you can use any spare ATAK on another model making your pennies go even further. Another excellent reason for using this ATAK set was the inclusion of some Karaya tow cables. I had never used these and in the past have found the Tamiya offerings hopeless and the Dragon ones pretty difficult to bend/shape into a convincing coil due to excessive wire-memory, however, these Karaya tow cables are sublimely soft and very easily malleable; I can’t recommend them highly enough.
Painting and Weathering:
I decided to keep the AFV colour scheme a monotone Dunkelgelb with the Schürzen following a late-war tritonal Ambush-variant scheme with the following colours:
• Lifecolor UA 204 Dunkelgelb RAL 7028
• Lifecolor UA 206 Olivgrun RAL 6003
• Lifecolor UA 205 Rotbraun/Schokoladen Braun RAL 8017
The tracks were painted with Tamiya NATO Black, then dry-brushed with Citadel Boltgun Metal, which works for me. Likewise, the steel parts of the on-vehicle tools & spare tracks were also made to look metallic using Tamiya NATO Black as the base colour, then they were dry-brushed with the three Citadel silver-coloured metallics; Boltgun Metal, Chainmail and then Mithril Silver. I find these Citadel colours have unique properties and whilst they do not form the bulk of my stock paints, their attributes are invaluable when dry-brushing, but one word or warning; be very careful with Mithril Silver as it is a very strong colour if overused.
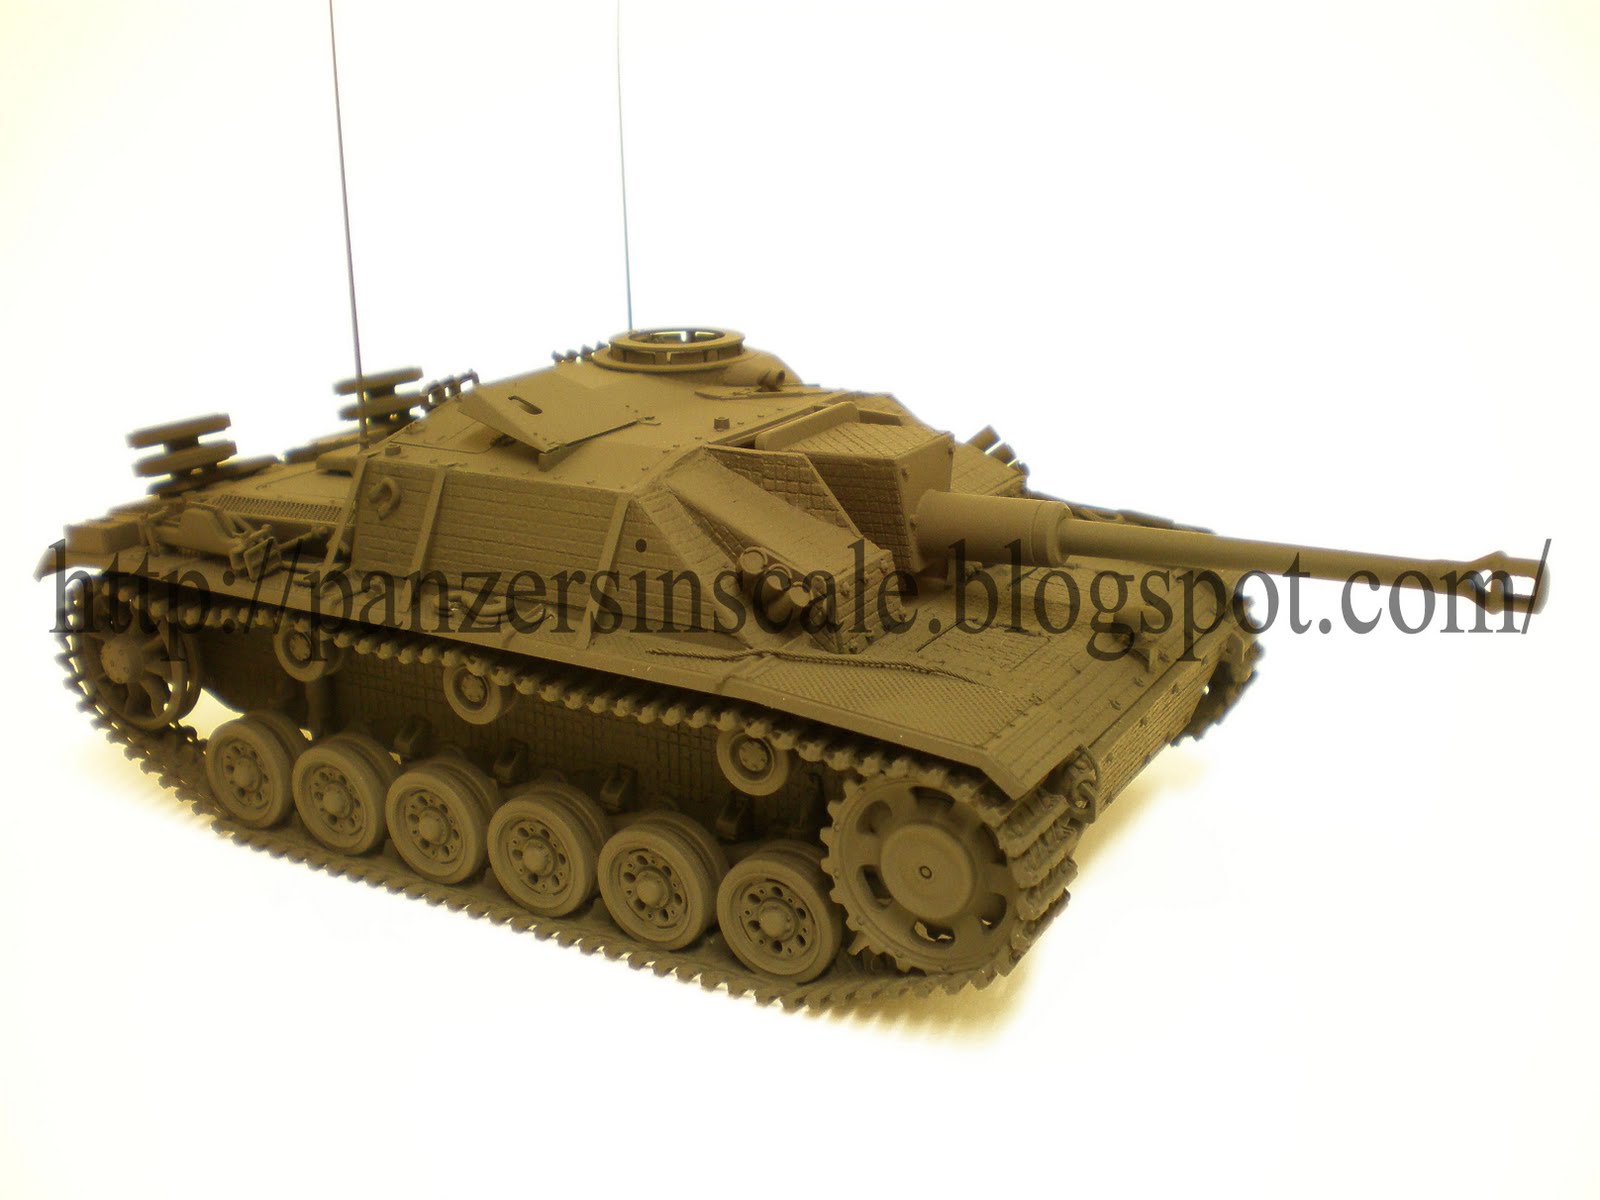
As you can see in the pre-priming coat shots I attached all of the items except the Schürzen onto the AFV before painting. This isn’t the ‘easiest’ of techniques, but with a little practice and nerve (painting chips where I occasionally over paint) I find it a more effective method of painting. I do, however, find attaching the Schürzen before the paint one step too far due to fragility of the bonding points.
The decals that I used were Cartograf that I had had knocking about in the spares box and some of the Tamiya decals used from the base kit; I decided to treat this as a ‘generic’ project and avoid getting bogged down on specifics, so stuck to tactical numbers and Balkancreuz, avoiding divisional insignia. In this instance I attached the decals after three filters onto the camouflage; the decals were applied using Micro Sol alone to an area spot-treated with Johnson’s Klear. After the decals had dried overnight yet again, I spot-treated the decals to another coat of Klear prior to the two-stage chipping and then the oil washes.
Regarding the filters, I washed the lower half of the vehicle with one blue filter, using MIG’s Sin Industries P240 Blue for Panzer Grey in an effort to further shade the running gear. When I first tried this technique I was horrified by the collection of blue pigments collecting in the running gear, but this later I mellows and actually suits this area of the vehicle very well. This blue appearance significantly reduced after later (Sepia) oil washes and weathering in any case, but the difference between the running gear and upper hull of the AFV (washed in MIG Industries P241 Brown for Dark Yellow) is fundamental. I applied two filters of Brown for Dark Yellow all over the AFV after the blue filter had dried. I do try to give each stage at least two hours…sometimes I can get a little impatient, though.
The oil washes were performed with Winsor & Newton Winton Burnt Umber to the hull and Daler-Rowney Sepia to the running gear.
After this things get a little complex with one thing and another, but I try to keep the painting of the outer Schürzen in tandem with the AFV, so try to get to the inner Schürzen as soon as possible including not only the base colour, shading and two generations of chips, but also oil stains and the like. This can get a little confusing, so I usually follow a template with about 30 steps each time, however, I find I often add to the system as I go along.
After the basecoat is filtered, chipped and washed I then proceeded to black dry-brushing the AFV edges to represent wear of the metal edges. I used to highlight dry-brushing, but find black is a more ‘realistic’ colour. When black dry-brushing it is quite important to avoid the flat surfaces, as you can often create a colour smudge, which looks unnatural, especially on Zimmerit, which wears in a different way to metal.
Once the model is ‘painted’ it is time for oil stains, and pigment work, which is done after a coat of matt lacquer, which for this AFV I used the Lifecolor offering.
Finally the StuG was given a generous dusting with MIG Pigments.
In all I was extremely happy with the outcome of this model and feel that the Bravo6 ‘Freezing Tanker’ works well with the StuG. This resin figure has been recently released and has some exquisite detail and absolutely no assembly being a one-piece. Painting the figure is a bit of fun; what with his Telogreika (Russian body warmer) jacket and Panzer trousers & cap our crewman has a bit of a mishmash of uniforms, but sure looks to be in a bad temper, so I don’t think he would brook much questioning about the provenance of his attire!
Bill Hazard
Build completed in January 2009
Background:
The Sturmgeschütz III assault gun was Germany's most manufactured AFV during WWII, with over 10,000 units being produced. If you think it looks similar to another German WWII tank, then you’d be correct as it was built on the Panzerkampfwagen III chassis. The most common variant of the StuG III was the Ausf G, the same variant that this model examples; over 7,000 of the Ausf G were produced, which saw many changes during its production run from late 1942 until the end of the war in 1945, but the original features are easy to see:
• 75mm StuK 40 L/48 barrel
• Three return rollers
• Six paired road wheels per side
• Turret roof flap-style hatches for the loader
• An especially made cupola for the commander; the Sturmgeschütz-Kommandantenkuppel had seven vision block periscopes, in addition it enabled the deployment of a SF14Z scissor periscope through a flap at the front of the cupola lid.
The StuG became particularly useful towards the latter part of the war, when Axis forces’ tactics had changed from their lightning-offensive of the Blitzkreig to the long, drawn out attrition of successive defensive withdrawals facing the onslaught of Bagration and the like. The features of the StuG that gave it the edge were its low silhouette and relatively powerful 75mm canon in a lighter and more easily manufactured chassis with less complicated and numerous parts. In a defensive role this particular ‘tank hunter’ was an excellent weapon of concealment when deployed against oncoming foes, where the classical idea of mobile tank warfare was less important than actually hitting the oncoming foe in a more subtle defensive operation.
The Kit:
For this model I used the 1/35 Tamiya base kit (35197) and the following aftermarket items:
• ATAK Zimmerit For StuG III Ausf G (Model 2) (35022)
• Eduard Sturmgeschütz III Ausf G grills (EDTP010)
• Eduard Schürzen ‘A-type’ Russia 1944 StuH 42/ Sturmgeschütz III (ED35721)
If you have not used ATAK Zimmerit sets, you are in for a pleasant surprise. I find this sheeted Zimmerit works especially well when bonded directly to the styrene with Tamiya Extra Thin Cement. You could use a form of cyanoacrylate, but doing this you have less opportunity for ‘playing’ the fit, furthermore, you could also use Pritt Stick if you wish, but I have found this to be a little more messy than other the other adhesives mentioned. One rather splendid thing about ATAK Zimmerit sets is that not only can you damage it but the sets usually leave a little bit over. In this instance all of the kit Schürzen covers were left unused, which allowed me to add coverage to the gun mantlet, reference for which I obtained from the recently released Panzerwrecks 7, ‘Ostfront’. With a little bit of imagination you can use any spare ATAK on another model making your pennies go even further. Another excellent reason for using this ATAK set was the inclusion of some Karaya tow cables. I had never used these and in the past have found the Tamiya offerings hopeless and the Dragon ones pretty difficult to bend/shape into a convincing coil due to excessive wire-memory, however, these Karaya tow cables are sublimely soft and very easily malleable; I can’t recommend them highly enough.
Painting and Weathering:
I decided to keep the AFV colour scheme a monotone Dunkelgelb with the Schürzen following a late-war tritonal Ambush-variant scheme with the following colours:
• Lifecolor UA 204 Dunkelgelb RAL 7028
• Lifecolor UA 206 Olivgrun RAL 6003
• Lifecolor UA 205 Rotbraun/Schokoladen Braun RAL 8017
The tracks were painted with Tamiya NATO Black, then dry-brushed with Citadel Boltgun Metal, which works for me. Likewise, the steel parts of the on-vehicle tools & spare tracks were also made to look metallic using Tamiya NATO Black as the base colour, then they were dry-brushed with the three Citadel silver-coloured metallics; Boltgun Metal, Chainmail and then Mithril Silver. I find these Citadel colours have unique properties and whilst they do not form the bulk of my stock paints, their attributes are invaluable when dry-brushing, but one word or warning; be very careful with Mithril Silver as it is a very strong colour if overused.
As you can see in the pre-priming coat shots I attached all of the items except the Schürzen onto the AFV before painting. This isn’t the ‘easiest’ of techniques, but with a little practice and nerve (painting chips where I occasionally over paint) I find it a more effective method of painting. I do, however, find attaching the Schürzen before the paint one step too far due to fragility of the bonding points.
The decals that I used were Cartograf that I had had knocking about in the spares box and some of the Tamiya decals used from the base kit; I decided to treat this as a ‘generic’ project and avoid getting bogged down on specifics, so stuck to tactical numbers and Balkancreuz, avoiding divisional insignia. In this instance I attached the decals after three filters onto the camouflage; the decals were applied using Micro Sol alone to an area spot-treated with Johnson’s Klear. After the decals had dried overnight yet again, I spot-treated the decals to another coat of Klear prior to the two-stage chipping and then the oil washes.
Regarding the filters, I washed the lower half of the vehicle with one blue filter, using MIG’s Sin Industries P240 Blue for Panzer Grey in an effort to further shade the running gear. When I first tried this technique I was horrified by the collection of blue pigments collecting in the running gear, but this later I mellows and actually suits this area of the vehicle very well. This blue appearance significantly reduced after later (Sepia) oil washes and weathering in any case, but the difference between the running gear and upper hull of the AFV (washed in MIG Industries P241 Brown for Dark Yellow) is fundamental. I applied two filters of Brown for Dark Yellow all over the AFV after the blue filter had dried. I do try to give each stage at least two hours…sometimes I can get a little impatient, though.
The oil washes were performed with Winsor & Newton Winton Burnt Umber to the hull and Daler-Rowney Sepia to the running gear.
After this things get a little complex with one thing and another, but I try to keep the painting of the outer Schürzen in tandem with the AFV, so try to get to the inner Schürzen as soon as possible including not only the base colour, shading and two generations of chips, but also oil stains and the like. This can get a little confusing, so I usually follow a template with about 30 steps each time, however, I find I often add to the system as I go along.
After the basecoat is filtered, chipped and washed I then proceeded to black dry-brushing the AFV edges to represent wear of the metal edges. I used to highlight dry-brushing, but find black is a more ‘realistic’ colour. When black dry-brushing it is quite important to avoid the flat surfaces, as you can often create a colour smudge, which looks unnatural, especially on Zimmerit, which wears in a different way to metal.
Once the model is ‘painted’ it is time for oil stains, and pigment work, which is done after a coat of matt lacquer, which for this AFV I used the Lifecolor offering.
Finally the StuG was given a generous dusting with MIG Pigments.
In all I was extremely happy with the outcome of this model and feel that the Bravo6 ‘Freezing Tanker’ works well with the StuG. This resin figure has been recently released and has some exquisite detail and absolutely no assembly being a one-piece. Painting the figure is a bit of fun; what with his Telogreika (Russian body warmer) jacket and Panzer trousers & cap our crewman has a bit of a mishmash of uniforms, but sure looks to be in a bad temper, so I don’t think he would brook much questioning about the provenance of his attire!
Bill Hazard
Build completed in January 2009


The StuG - always a versatile choice.
ReplyDeleteNice work!!